I’m using the following fancy router not only to share the internet connection via WiFi at home, but also to run Domoticz – a home automation system (I will probably write more about it in my further posts).

A feature of this router is that it works on
OpenWrt – a Linux-based open-source firmware for routers, which makes it very attractive for IoT enthusiasts, because they don’t need to flash or unlock it to run their custom services there. It’s allowed out of the box.
In order to make Domoticz web interface available from the outside of my home LAN, I decided to setup a VPN on my publicly accessible server and connect the router to the VPN. The firmware natively supports OpenVPN configs. Everything is great, you just need to upload an OpenVPN client config and it will work, but it’s done in assumption that all traffic should be forwarded through the VPN, while I don’t want pass gigabytes of my meaningless home traffic through the server. Instead I need to pass only the traffic related to the VPN through the tunnel. Looks like this problem can not be resolved by standard tools via a web interface and I decided to leverage custom_config option in the OpenVPN configuration.
I’m not going to describe everything step-by-step, since this article is more like a note for myself than comprehensive tutorial 😉 Instead I would just briefly show what changes I made to achieve the result after few days of trial and error. The following changeset is relevant to the firmware version 3.019 (OpenWrt 18.06.1, r7258-5eb055306f)
/etc/config/openvpn
|
|
config openvpn custom_config # Set to 1 to enable this instance: - option enabled 0 + option enabled 1 # Include OpenVPN configuration - option config /etc/openvpn/my-vpn.conf + option config /etc/openvpn/privnet.conf |
/etc/config/network
|
|
option macaddr 'e4:95:6e:42:a8:36' option default_macaddr 'e4:95:6e:42:a8:36' +config interface 'vpn' + option proto none + option ifname 'tun0' + option auto 1 + config interface 'wan' option ifname 'eth0' option proto 'dhcp' |
/etc/config/firewall
1 2 3 4 5 6 7 8 9 10 11 12 13 14 15 16 17 18 19 20 21 22 23 24 25 26 27 28 29 30 31 32 33 34 35 36 37 38 |
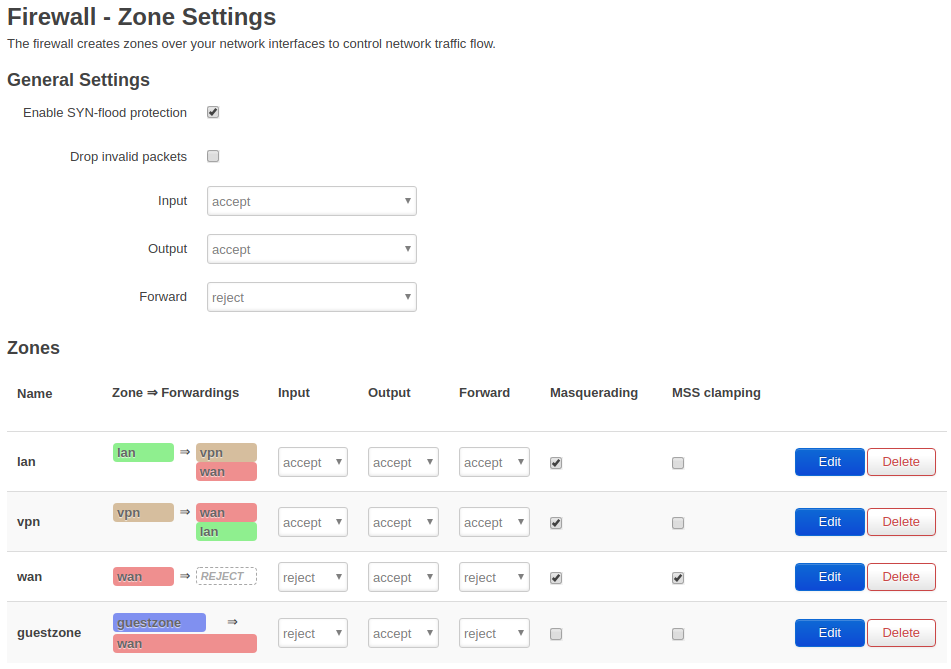
config zone option name 'lan' list network 'lan' option input 'ACCEPT' option output 'ACCEPT' option forward 'ACCEPT' + option masq '1' + +config zone + option name 'vpn' + list network 'vpn' + option input 'ACCEPT' + option output 'ACCEPT' + option forward 'ACCEPT' + option masq '1' config zone option name 'wan' list network 'wan' list network 'wan6' option input 'REJECT' option output 'ACCEPT' option forward 'REJECT' option masq '1' option mtu_fix '1' +config forwarding + option dest 'wan' + option src 'vpn' + +config forwarding + option dest 'vpn' + option src 'lan' + +config forwarding + option dest 'lan' + option src 'vpn' + |
Afterwards you will see the following settings in LuCI Web Interface at /cgi-bin/luci/admin/network/firewall/zones:

/etc/openvpn/privnet.conf
|
|
+client +script-security 2 +route-noexec +route-up privnet-routing.sh ...my specific OpenVPN configuration... |
☝️ I don’t assign routes pushed from the server, instead routing is set up in privnet-routing.sh script.
Make sure that daemon option is disabled/removed, otherwise /etc/init.d/openvpn script will endlessly create openvpn processes
/etc/openvpn/privnet-routing.sh
|
|
+#!/bin/sh + +P2P_ADDR=`ifconfig tun0 | awk '/P-t-P/{sub("P-t-P:",""); print $3}'` + +ip route add $P2P_ADDR via 0.0.0.0 dev tun0 +ip route add 10.8.0.0/24 dev tun0 |
☝️ This is quite specific for my VPN configuration (peer-to-peer 10.8.0.0/24 net), keeping it just as an example. Your case will likely be different.
Configure OpenVPN to autostart
|
|
/etc/init.d/openvpn enable |
Reboot or run
|
|
/etc/init.d/network restart; /etc/init.d/firewall restart; /etc/init.d/openvpn restart; |
to make the changes take effect.


